Thursday, August 18, 2011

FUSION KNOTS

The Fusion Knot tying technique was created by JD of TyingItAllTogether and the designs shown in this post are all his designs. I saw most of, if not all of these designs on the TyingItAllTogether Facebook page. At the time I tied these, he hadn't yet presented tutorials on the designs and I enjoyed the challenge of trying to tie them myself.In this article, I will show four designs that I really like and I hope you will as well.

THE DRAGON EGG PARACORD POUCH


This design is a modification of the Paracord Utility Pouch that is tied with an extra strand of paracord. JD originally showed this design as a TIAT Concept Preview.
JD will probably show a video of the tying technique for this design soon. But, you can try to figure it out for yourself, the only difference in tying this design and the Paracord Utility Pouch design is starting the Crown Knot. JD has a video that will help you tie the Crown Knot, it is called the (Cylindrical) Secret Compartment Fob, and it will show you how to tie a three strand Crown Knot. Once you've figured that out, then you should have no problem tying JD’s Dragon Egg Paracord Pouch.


THE TIRE TREAD BAR


I originally saw this design on the TIAT Facebook page and when I tried to tie it there was no tutorial available. Since then JD has created a video of the tying technique for this design. This design is one of two of JD’s modifications on the Solomon Bar that are in this article. Both of which would make a great key chain or bracelet.


THE BLAZE BAR AND MATED SNAKES


Wednesday, August 17, 2011

HOW TO BUILD THE COMPACT PARACORD JIG

A jig is useful for tying many types of paracord bracelets and other designs. I first discovered a jig in use from a video by Dave Canterbury. The video showed Dave’s wife Iris tying a Solomon Bar bracelet at great speed. It really got my creative juices flowing; I thought that if the jig would measure and accept many different buckle sizes and alternatives then it would make my life much easier.

The Compact Paracord Jig is the third revision of the original design. It started with the large version, and then came the better design. The second design was a great design but when using it; I found that it was just a bit too long. That is why I created a third version of the jig that should be long enough to tie any length of bracelet you need while still being easy to use and store.

This article should answer many questions about building one of these jigs and I will explain how to create the sliding slots.


GATHERING THE MATERIALS AND  TOOLS
Building one of these jigs is fairly easy and makes for an excellent Saturday project. The tools needed are listed below but you should only use tools that you feel comfortable using. The materials are also listed below, they can be purchased at your local building supply company, I purchased everything needed to build this jig at my local Lowe’s Home Improvement store.

MATERIALS LIST
  • Wood (for this tutorial I will be using 3/8” thick pine boards that are available at Lowe's and other home improvement centers for projects)
  • (1) 3/8” x 6” x 24”
  • (1) 3/8” x 3” x 24”
  • (1) 3/8” x 2” x 24”
  • (1)  ¼” - 20 x 1-¼ Hex Cap Bolt
  • (1)  ¼” - 20 Wing Nut
  • (4) ¼” Fender Washers
  • (2) ¼” – 20 x 5/16” Pronged T-Nuts (¼“ deep T-Nuts may work better)
  • ¼” Plastic Cable Clamps
  • (14) #6-½” Wood Screws
  • Wood Glue (not necessary, but it helps hold the project together)
ROUTER SLOT JIG MATERIALS
  • (1) 1” x 2” x 48” pine board (you may choose to use a different size or whatever you have scrap)
  • (8) 1-½“ Wood Screws
  • (4) 1-½” – 2” Hex Cap Bolts with Fender Washers and Wing Nuts 

TOOL LIST
This is a list of the tools that I use to create my jigs; some of these tools can be substituted for other tools if you don’t have the tool listed.
  • Miter Saw (a Circular Saw or Hand Saw may also be used)
  • Router (depending on whether or not you care about looks, this is mandatory to have but some folks use a drill bit to create the slot which looks sloppy but works)
  • ¼“Straight Router Bit (the size of this bit will determine the how wide the slider slot will be. If you choose a different size bit then you will need a bigger Hex Cap Screw to match the size.)
  • Router Table (not necessary but it will make life much easier if you have one)
  • Router Slot Jig (this isn't necessary to have, but it creates nice straight slots for the sliders, to create the jig you will need a 1” thick 2”W x 48”H pine board)
  • ¼” Drill Bit (the same size bit as the Router Bit)
  • Orbital Sander (not necessary but it makes building one of these jigs much easier)
  • Eye and Ear Protection
  • Square (not necessary but useful)
  • Hammer
  • Pencil
  • Drill with Phillip Screw Driver Head (not necessary but useful)
  • Printer (not necessary, you can mark the wood with a pen or pencil instead)
BUILDING THE COMPACT PARACORD JIG


STEP 1. Cut the boards as described in the image to the left. You will end up with extra wood which you can use to make an extra Top and Bottom Buckle Holder.

STEP 2. Place one of the two inch Rails on top of the lower left corner of the six inch wide Base board. Now place one of the three inch wide Sliders on the right side of the Rail, and then place the other Rail on the right side of the Slider. If you center the Slider you will notice that the rails stick over just a bit but that’s okay, centering the Slider is the important part.


STEP 3. Now that the test fit is done, we will now mount the Rails permanently. Do this by placing Wood Glue on the underside of the Rail and securing it in place with Wood Screws (wood glue isn’t necessary but is useful).

STEP 4. Repeat the previous step with the right Rail. NOTE: Make sure the Slider slides freely and the Rails aren’t too tight against the Slider. Sand the sides of the Rails until they are even with the Base board.

STEP 5. At this point, both Rails should be securely mounted to the Base before moving forward. Grab one of the Top Buckle Holders, measure to find the center of the piece vertically (take your time when measuring; this is an important piece because you will use this piece as a template for the other Top Buckle Holders. Measure over one inch from the side and mark it at the center that you just measured, do the same on the side. You will end up with two marks, both should be one inch from either side and centered from top to bottom.

STEP 6. With your Drill and ¼” Drill Bit, drill holes where you marked in the previous step.

STEP 7. Place the Top Buckle Holder that you just drilled on top of the other Top Buckle Holder. Make sure both pieces are aligned on the sides of each other, and that the piece with the holes drilled out already is on top. Then drill through the Top Buckle Holder to the other Top Buckle Holder. You will end up with two drilled Top Buckle Holders, if you have another Top Buckle Holder; repeat this step to drill the holes for it.

STEP 8.  Now place the Top Buckle Holder that you marked and drilled in Steps 5 and 6 on top of the Base piece and align it at the top making sure the top and sides are aligned evenly with the Top Buckle Holder. Drill through the Top Buckle Holder into the Base, drill to the depth of Pronged T-Nut you purchased (I prefer not to drill all the way through the piece but it may be necessary).

STEP 9. Grab the Pronged T-Nuts, a hammer, and a scrap piece of wood. Then place one of the Pronged T-Nuts on top of one of the holes you drilled in the Base. Place the scrap piece of wood on top of the Pronged T-Nut and hammer in place. Repeat this step for the other hole.

STEP 10. The Base and Top Buckle Holders should be completed before moving on to the next step.

STEP 11. Grab one of the Sliders (Bottom Buckle Holder), measure to find the horizontal and vertical center and mark with a pencil. Measure ¾” off of the top and bottom mark it clearly (this will be your stopping point not to go past with the Router). You should have three marks, one on each end and the center. Repeat this step for each of your Sliders.

STEP 12. On the center point you marked in the previous step, drill a hole with the Drill and ¼” Drill Bit. Repeat this procedure on the other Sliders.


STEP 13. Place one of the Sliders on the Base in between the Rails in the natural state (not raised or lowered, even with the rail tops).


STEP 14. Drill a hole through the hole in the Slider through the Base board. 

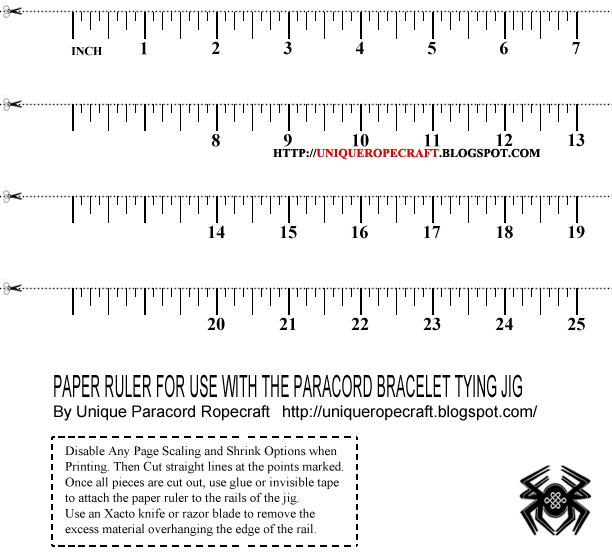
STEP 15. Download the Printable Ruler and follow the instructions listed on the printed sheet to install the Ruler.


STEP 16. Now we need to cut the slot in the Sliders, there are several ways this can be done and will be covered in the next section.


STEP 17. Once you have cut the slots in the Sliders, sand the jig to a smooth finish.

STEP 18. Use #6-¼” Wood Screws to secure the Cable Clamps to the Top Buckle Holders and Sliders.


CUTTING THE SLIDER SLOT

Here are just a few methods of cutting the slot for the Sliders:
  • Using a Router with Straight Bit (the size of the bit will determine how wide the slot will be, I chose to use a ¼” Straight Router Bit)
  • Using a Jig Saw
  • Using a Circular Saw 
  • Using a Table Saw (a dado blade isn't required but would work, but the width of slot may be too wide)
  • Using a Drill (this method is probably the worst, it leaves a really sloppy end result)
CUTTING THE SLIDER SLOT USING A ROUTER WITH STRAIGHT BIT
WARNING: READ OWNER’S MANUAL BEFORE OPERATING A ROUTER. A ROUTER WORKS BY SPINNING A BIT AT A VERY HIGH RATE OF SPEED, ANYTHING THAT CONTACTS THE BIT WILL BE CUT SO KEEP YOUR FINGERS CLEAR OF THE BIT AND ALWAYS USE A PUSH STICK AND WEAR EYE AND EAR PROTECTION.

As stated above, the size of the Straight Bit is important when using this method. I used a 3/8” Straight Bit in my first few jigs, but now I’ve started using a ¼” Straight Bit and I really like the result.

I recommend using a Router Table to route the slots for the Slider, I will be using one for this article. 
  1. Unplug your Router and install the Straight Bit in your Router and then adjust the depth bit (make sure it’s high enough to cut the entire piece).
  2. Grab a scrap piece of the 3” wide stock (this needs to be the same type of wood that you are using for the Sliders). Mark the center of your 3” wide scrap stock.
  3. Grab a Drill with a Drill Bit that is the same size as the Straight Bit in your Router (i.e. if you are using a ¼” Straight Bit then you will use a ¼” Drill Bit).
  4. Drill a hole in the 3” wide scrap stock using the marks that you marked in Step 2.
  5. Place the 3” wide scrap stock on the Router Table with the Straight Bit running through the hole you just drilled.
  6. Keep the 3” wide scrap stock in place and place the guide rails of the Router Table against the scrap stock. Depending on the length of your scrap stock, you might have to use a tape measure to setup the guide rails if the scrap stock isn't long enough.
  7. Make sure each of your Sliders have the ¾” start and stop points marked as described in Step 11 of the Building the Compact Paracord Jig section, these marks are where you will stop routing.
  8. Plug your Router into an electrical outlet and then put your eye and ear protection on. Drill a hole in the center of a Slider at the center mark.
  9. Run the Straight Router Bit through the Slider hole you just drilled.
  10. You are now about to start routing the slot. Using a push stick to hold the Slider against the rail of the Router Table, turn on the Router and start routing the slot until you get to the ¾” mark and then route back to the other ¾” mark.
CUTTING THE SLIDER SLOT USING A ROUTER WITH STRAIGHT BIT AND JIG
  1. Follow the instructions in the “Building the Jig“section below to build the jig.
  2. Place the 3” wide scrap stock that you drilled earlier inside the jig.
  3. Now take the jig and scrap stock to the Router Table and run the Router Straight Bit through the hole in the scrap stock.
  4. Either clamp the jig to the Router Table or drill holes and attach several Hex Cap Bolts with Wing Nuts and Fender Washers to attach the jig to the Router Table (make sure it is secured tightly).
  5. Remove the scrap stock from the jig.
  6. Drill a hole using the center mark in one of the Sliders.
  7. Place the Slider in the Jig through the hole you just drilled.
  8. Plug the Router into an electrical outlet and then put your eye and ear protection on.
  9. Using a push stick to hold the Slider down, turn the Router on and begin routing by pushing the Slider with the push stick either left or right towards the ¾” mark on either end.
  10. Once you've reached the ¾” mark, stop and then go in the opposite direction towards the other ¾” mark.

BUILDING THE SLIDER JIG


STEP 1. Grab a 1” x 2” x 48” board and mark 18” on both ends, and then cut both marks.


STEP 2. With the remainder of the board, mark 5-½”-6” from both ends, and then cut both marks.


STEP 3. You should now have four boards, two of them should approximately 18” and the other two should be approximately 5-½”-6”.

STEP 4.  Sandwich two of the 18” boards between one of the Sliders, then place the other two boards on top of the 18” boards on both ends and secure them in place with Wood Screws (the Slider should be able to move but not allowing too much play).


CUTTING THE SLIDER SLOT USING A CIRCULAR SAW

To cut the slot using a Circular Saw you will be making several cuts in order to complete the slot. 
Note: Most Circular Saw blades are 1/8” wide.
  1. Measure to find the vertical center of your Slider, mark the center at the top and bottom of the Slider and then use a straight edge to join the two marks and you will end up with a mark directly down the center of the Slider.
  2. For this article I will be making a ¼” wide slot, you should make adjustments to the article if you intend to make the slot wider. At the top of the vertical center mark in the Slider, measure over and mark at 1/8” from the center line on both sides of the center line.
  3. At the bottom of the vertical center mark in the Slider, measure over and mark at 1/8” from the center line on both sides of the center line.
  4. Use a straight edge to make a line from the top left mark to the bottom left mark.
  5. Use a straight edge to make a line from the top right mark to the bottom right mark.
  6. You should end up with a ¼” slot drawn out on the Slider.
  7. Now you have three lines on the Slider, you will use these to cut with the Circular Saw, leaving you with ¼” slot. You can also cut these lines using a Jig Saw or Table Saw.
THE FINISHED COMPACT PARACORD JIG

 Oak Compact Paracord Jig


Pine Compact Paracord Jig


This article took longer to publish than I had anticipated, but I hope that it makes it easier for everyone to build one of these jigs.

If you have any questions or if there are parts that aren’t clear in this article then please let me know.

This article can be downloaded in pdf form for easier viewing. The downloadable version is the original document, unlike the pdf button below which prints this post to pdf.


SOURCES AND REFERENCES
  • The original version of this article in PDF form - Download 
  • Simple Paracord Bracelet Jig Video - Uploaded by wildernessoutfitter

Tuesday, August 2, 2011

UNIQUE EMERGENCY SOLOMON BAR

If you have searched the internet for a "survival paracord bracelet" then chances are that most of the results were for a Solomon Bar bracelet, and that's fine but I wouldn't want the task of unraveling a Solomon Bar bracelet while in a survival situation. I would want a bracelet that can go from bracelet form to one long strand of paracord in less than a minute.

With this tying technique you will end up with a bracelet that is very similar to a Solomon Bar but it can be unraveled in seconds.


If you read my announcement marquee, I said that the first weekly post would be on Monday, August 1 but like most of the time, I got behind and couldn't get this post out on time, sorry. I had to rush this post so I didn't have time to take any images of the tying process but I will soon if there is a need for it.
As I often do when researching knot designs, I troll the internet for new innovative designs, which is how I discovered this video. The author titles the design as a "Chain Sinnet Square Knot". Though the video is grainy and hard to see at times, I believe everyone can see enough to quickly figure out how to tie this knot.

This design is very similar to a Solomon Bar and most people want be able to tell a difference but there is a slight difference. Once tied, the loops run at angle but if you massage the paracord carefully, much of this want be seen. As for the buckles, I may have to show images of how I tied mine because I didn't tie mine like the author of the video, you should tie the buckles the way you feel most comfortable and what looks the best to you.


SOURCES AND REFERENCES

Monday, July 18, 2011

HOW TO MAKE A MONKEY FIST TYING TOOL


The Monkey Fist Knot was originally tied at the end of a rope to serve as a weight, making it easier to throw. Nowadays it serves for more of a decorative knot but can be used in many different ways such as a weapon.

With this post I decided to show how I tie a Monkey Fist Knot using a tool that anyone can make.


To make the tool for tying the Monkey Fist Knot, gather a clothes hanger from your closet and a pair of wire cutters. Follow along with the image tutorial provided below (double-click the image to view the original size of the image).


TIP: Your tool does not have to look exactly like mine, get creative and mold your own design based on what you like the best. The tool simply replaces your fingers so remember that when you're making your tool.

How to Bend the Tool

Now that the tool has been created, we can then tie our first Monkey Fist Knot using the tool. To tie the Monkey Fist Knot using the tool, follow the image tutorial provided below.Note: You can use other tying methods to tie the Monkey Fist Knot, I chose this method for clarity but may not be the best way for your intended purpose, you decide.

Tying a Monkey's Fist Using the Tool


Monday, June 20, 2011

UNIQUE PARACORD BRACELET/NECKLACE TYING JIG-REVISITED

I decided to redesign the bracelet tying jig because no matter what I tried, after I painted it, when I would try to reposition the slide, it was always stuck and I would have to pry it up with a screwdriver to move it.  

The main difference in this design is the ruler and ruler guide,I was going to put a ruler on last time but the design wouldn't allow it.


To make this jig easy for everyone to build, I decided to design it so that it would require only a few cuts (five cuts are required, if you use the same size boards as shown).
Click any of the images to view the full size of the image.

With the new design, you no longer have to measure where top lace the bottom slider because a ruler is built-in, and with the ruler guide,accurate measurement is as easy as 1-2-3.


Here is the list of materials (all can be purchased from Lowe's, I have included the item number for the materials to use at Lowe's):
  • (1) 3/8 x 6 x 24 Select Pine Craft Board | Item #: 50237 ($3.09)
  • (1) 3/8 x 4 x 24 Select Pine Craft Board | Item #: 50234 ($2.18)
  • (2) 3/8 x 2 x 24 Select Pine Craft Board | Item #: 50226 ($2.56)
  • (1) The Hillman Group  Brass Plated Safety Cup Hook 7/8" | Item #: 330639 ($1.18)
  • (1) Elmer's 4 Oz. Carpenter's Wood Glue | Item #: 41148 ($1.98)
  • (1) IDEAL  3/8" Cable Clamp 15 pack | Item #: 48294  ($1.58)
  • (2) Fender Washers ($0.20)
  • (1) 1/4-20 x 1 Bolt ($0.15)
  • (1) 1/4 Wing Nut (?)
  • (6) ¾” screws to temporarily secure the boards in place while cutting the rails
  • Invisible Tape (glue could be used)
  • Download the Adobe Acrobat Version of This Tutorial
  • Download Plans for this project (right-click the image and select "Save Image As...")
  • Printable Ruler
    • Download my printable ruler (right-click the image and select "Save Image As...")
    • Download a variety of different rulers to print here.
Materials Note: This project can be completed with different materials using different types of wood and board thicknesses, but to use different board sizes you must refer to the bottom of the Plans image.


PREPARING THE PAPER RULER
First, decide which ruler you want to use and then print it out (disable any page scaling or shrink options before printing). Then, cut along the dotted lines only. Now, using either paper glue or invisible tape, join each of the lengths of the ruler together. Notice on three of the ruler cut-outs that the first two inches don’t have a number, this is by design, starting with the ruler cut-out that starts with “8”, slide the first two inches underneath the first cut-out. You should be able to see through the paper enough to tell where the long vertical mark is underneath, slide it even with the top “7” line. Continue to do this with the other two cut-outs and you will end up with a twenty-five inch paper ruler.


CUTTING THE VERTICAL SLOT
Starts by using your router to rout a slot down the middle of the four inch wide board, the exact dimensions are on the plans image.
If you don't have a router you can use a drill with a bit the size of the slot to be cut and a circular saw. Drill two holes, one on each end of the slot, then mark two lines the length of the slot that will be the thickness of the slot. Now make two passes with the circular saw by cutting both lines you just marked. Once cut,the slot should fall out since you drilled the two outside corners already, depending on the thickness of the slot, you may need to make another pass with the circular saw to remove all material in the slot. 
This step sounds much harder than it actually is but I wanted to make the instructions clear.


PREPARING THE CUTS
This part is very important, if your are using the same size boards as I used, then you will notice that a 6" wide board isn't a full 6 inches, I have taken this into account when I designed the plans for this image. But if you are just going to cut out the pieces from scrap or other size boards you will need to estimate for yourself, for example, the rails are approximately 1" wide, the ruler guide would need to be 6" wide and then the other boards should be cut to the length specified in the plans.

CUTTING AND PLACING THE RAILS
Gather all four boards and place them together, then center the 3/8x6x24 underneath the other three boards as shown in the image below, the rail boards (3/8x2x24) will be sticking over the edge slightly (refer to the image below). Now grab some screws and temporarily secure all boards in place (you can use the Wood Glue to secure the rails in place but don't use any glue on the center board).
Once secured, use the circular saw to rip the edges of the rail boards even with the 3/8x6x24 board (two cuts are required, cut at the dotted line of the image below).


FINISHING CUTS
Now remove the screws that are holding the center board in place. Use the plans image for directions on cutting the 3/8x4x24 board, there will be three cuts. Measure your bottom board (3/8x6x24) to find out the exact width of the board because it won’t be exactly six inches (mine was 5-3/8”wide). Once you measure the board you will know how wide to cut the ruler guide.


ASSEMBLY
Now that all of the boards are cut, you should have six boards (four if the rails are secured to bottom board).
  • Glue the backside of the top board (the two inch piece), and then place it on the bottom board.
  • Place the slider board (the four inch piece) on the bottom board. Glue the top of the slider board and place the ruler guide board (the one inch piece) on top of the slider board (this board should be even on both sides with the bottom board).
  • Measure to find the center of the slider board and then drill a hole wide enough for your bolt to pass through.
  • Place the paper ruler on the left side of the rails;make sure the start of the ruler is even with the bottom edge of the top board(the two inch piece). Then secure the ruler in place using invisible tape, I made sure to cover the entire paper surface of the ruler so that it won’t hang on the ruler guide and it will be easier to clean should it get dirty. Remove the excess ruler with an Xacto knife or razor blade.
  • Measure the width of the top board (the two inch piece). Mark three spots (try to center the marks) for your buckles and hook (I placed the hook in the middle spot on mine).
  • Remember your measurements you made on the top board and transfer the marks to the ruler guide on the slider board and then screw down the cable clamps and hook. Since there is limited space for attachments, you should pick the buckle sizes that you use most often. 


THE FINISHED JIG


USING THE JIG
The jig can be used to tie all sorts of ties where you need tension on the strands to tie it.

If you are tying a bracelet or other design that uses buckles, follow these directions:
Attach the male end of the buckle to the female end mounted to the jig and vice versa for the other end.Now set the jig to the size of bracelet or other design you will be tying, i.e. 7½ inches. 
From here all you have to do is continue as you would normally tie the knot design using buckles.

If you are tying a bracelet or other design that doesn’t use buckles, see the images below.

Solomon Bar Bracelet


Over-and-Under Weave