Thursday, March 29, 2012

QUICK DEPLOY EMERGENCY BRACELETS


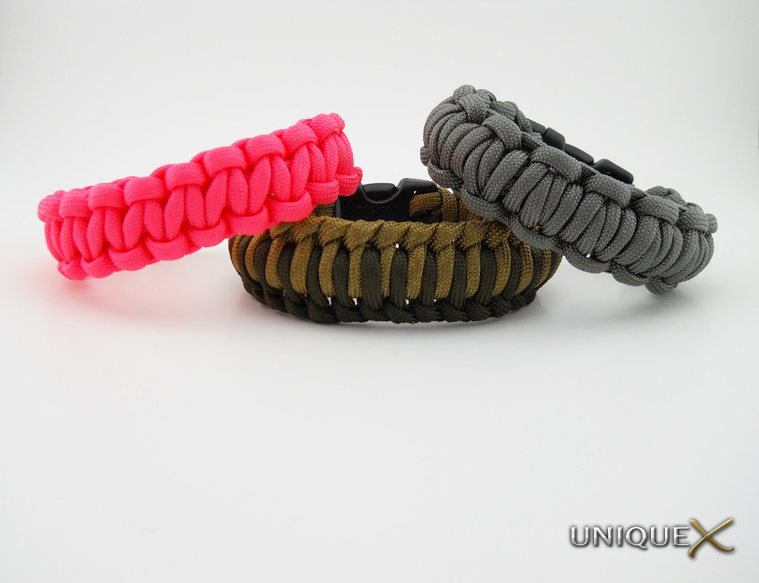
For this post, I decided to show some of the newest "quick deploy" solutions for creating emergency paracord bracelets. You may have noticed one of the designs in the image from before, I previously featured it for an emergency bracelet and I thought it would fit perfectly with the other two bracelet designs.


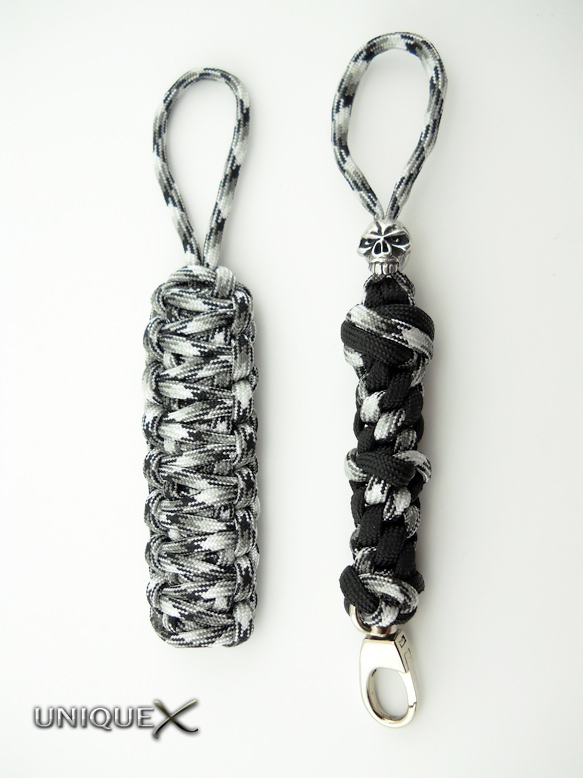
Both of these bracelets are created in a similar way. The foliage green bracelet (the bracelet on the right) is called the Millipede Survival Bracelet by paintballhead03 and used around 12 feet of paracord to tie. The other design is something I thought of when tying the Millipede bracelet, it's simply a Genoese Bar bracelet that is tied around a Slip Knot the same way as the Millipede bracelet is tied. This design may have been created before and if needed I will provide a tutorial that shows the tying technique. Until then, follow the instructions from the Millipede video that shows the starting technique which uses two Slip Knots, one for each strand, then instead of tying the Millipede wrap over the Slip Knots, tie a Genoese Bar over the Slip Knot cores.

Chain Sinnet Square Knot Emergency Bracelet
For the other quick deploy bracelet I have decided to show the Chain Sinnet Square Knot once again, but this time it's tied using Salmon paracord because the ladies need emergency bracelets too. The creator of this knot design, Andy Smith, created the video from which I learned to tie this bracelet. It's fairly straight forward and of the three designs is probably the easiest to tie and looks most like the Solomon Bar.

The Millipede Survival Bracelet
Genoese Bar Millipede Survival Bracelet

SOURCES AND REFERENCES

Wednesday, March 14, 2012

DIY PARACORD LACING NEEDLE

I once thought that there was no way that someone with basic tools could produce a better Lacing Needle than the Tandy Leather Factory's Perma Lok Lacing Needle, until now. After trying many different techniques from collaborations between my readers and I, I decided that I would take the simplest route possible. You can make this type of Lacing Needle with little more than a screw driver, drill and something to cut the needle material (i.e. hacksaw or Dremel).


MATERIALS
TOOLS
  • Screwdriver
  • Drill
  • Hacksaw (anything that will cut the needle)
  • Vise (anything that will securely hold the needle)


INSTRUCTIONS
 Once you've acquired the tools and materials, the rest is fairly easy. CAUTION: ALWAYS WEAR SAFETY GLASSES WHEN WORKING WITH METAL AND FOLLOW SAFETY GUIDELINES OF THE SPECIFIC TOOL YOU ARE USING. 
Please excuse the mess in my workshop
  1. Determine the length that you want the needle to be and mark it and then cut it.
  2. Place the needle in an upright position in the vise.
  3. Using the #43 drill bit, drill down the center of the shaft of the needle to a depth of  ¼" (be careful to drill straight down the center). I used a smaller bit before using the final bit so that it is easier to drill the center point.
  4. Use one the 4x¾ Metal Screws, screw in the screws with the screwdriver until you reach the total depth.
  5. Remove the screw and you're pretty much finished. If you want to produce the polished look like my final result you will need to remove the paint from needle. I used my Dremel, but you can use sandpaper in a pinch. Once sanded, use a polishing compound to bring the needle to a brilliant shine (I recommend using Flitz, it's the best polish on the market). 
Perma Lok Needle, Size 5 Needle, Size 6 Needle


SOURCES AND REFERENCES

    Monday, March 12, 2012

    URBAN CAMO FOBS


    My most recent purchase from Supply Captain included this Urban Camo paracord and the Emerson Skull attached to the loop of the Crown Sinnet. For the other fob I chose to use the classic style of the Solomon Bar which will never go out of style.


    To make this fob, you will need to know four knots: Matthew Walker Knot, Round Crown Sinnet, and the Wall Knot.
    To tie a Round Crown Sinnet, you can follow my Instructables tutorial, but instead of six strands, use four. Links to the remainder of the tutorials are located in the Sources and References section.


    SOURCES AND REFERENCES

    Saturday, March 10, 2012

    PARACORD HANDGUN MAGAZINE POUCH


    This tactical-looking pouch can be tied easily using one knot design. If you look closely at the pouch you will notice that it is simply a Wide Solomon Bar that is lashed together on the sides.
    The amount of paracord you will need depends on the size of the pouch, I used four-seven feet long strands for the Wide Solomon Bar section and two-four feet long strands for the sides. You will also need a short strand to go around the top of the pouch and about two feet for the Solomon Bar on the backside to make a loop for a belt.

    You will notice that most instructions on tying a Wide Solomon Bar uses three strands, the two strands on either end are for the Solomon Bar section and the middle strand is the "X" strand that joins the two Solomon Bar sections. I added an extra strand to each of the Solomon Bars in order to make the finished Wide Solomon Bars wider so that the magazine will slide in and out of the pouch easier.


    You need to measure the full vertical length of your magazine (front-bottom-back). View the video by JD at TyingItAllTogether to show the tying technique. You will notice there is a single strand that is the core strand that both sides of the Solomon Bar are tied around, both of these strands need to be just a little longer than the length you previously measured. Instead of using a metal ring to lash the strands, use a length of paracord approximately one foot long. Keep tying until you've almost reached the length you need. Use the inner core strands and form a loop on the end of each strand and either sew it together, or singe it together. Continue tying the Wide Solomon Bar until you've almost covered the loops, bring the bottom end around the back forming a "U" shape and then insert the strand that you used for the metal ring into the loops that you formed.


    For the sides, I removed the inner strands of the paracord and made a zigzag pattern to lash the sides together.


    For the belt loop, I attached a short strand of paracord through a couple of loops on the backside by using a Lacing Needle. Once I had two strands attached to the pouch, I tied a Solomon Bar around the strands.

    That's pretty much all there is to tying this pouch, it is really easy to tie once you've figured out how to tie the Wide Solomon Bar.

    SOURCES AND REFERENCES

    Tuesday, March 6, 2012

    BRAIDED TURK'S HEAD LANYARD

    Recently while trolling the internet, I came across this design tied by a fellow Blogger. He was tying the design mainly for use as a leash, but this is a tough, rugged looking design that can be used in many different ways. Before tying this lanyard, I thought about using this design as a strap to replace the "Oh Crap" handles in my Jeep.

    Tying this design will take patience and time to create a great looking piece. Since I usually try to only post knot designs that are fairly easy to tie, I hesitated on posting this here, but I feel that the novice knot tying enthusiast can tie this with a little effort. It is tied in parts which will make it difficult to determine the amount of cord you will need. The full length of my lanyard was 16 inches and required 12 feet for the Turk's Head section, and two 40 inch lengths for the braided core. It is tied with a Long Two Bight Turk's Head on top of a Four Strand Braided Core.
    Once you've determined the length you want to tie, start braiding, I showed this technique here and I also included the tying diagram below.  When you finish braiding, start the Turk's Head Knot.
    Bud Brewer created a tutorial on tying a Long Two Bight Turk's Head and expanding it to Long Four Bight Turk's Head, but we only need the first part for this design.
    When tying the Turk's Head, make sure the strands fall in place over the braiding in order to get the best end result.


    SOURCES AND REFERENCES