Wednesday, February 29, 2012

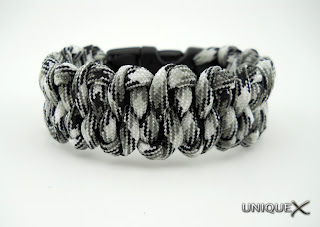
DRAGON'S TONGUE BRACELET WITH BUCKLES


I recently purchased some exciting new colors of paracord from Supply Captain and I thought I would use one of those colors to tie one of my favorite bracelet designs by TyingItAllTogether. The color I chose to use is called Urban Camo and I used approximately 6-7 feet for the main design, you will also need a core strand, I used approximately 2 feet of black.


Click the Image to  Expand View

ATTACHING THE BUCKLE
Click the Image to  Expand View
To tie a Dragon's Tongue bracelet using Buckles is pretty much a matter of what looks best to the one who is tying the bracelet.
I chose to start by tying two Cow Hitches leaving the black (2 feet) strand in between the Urban Camo (larger strand). And then I simply followed the instructions from the video by JD at TyingItAllTogether until I reached the desired length of my bracelet.
From there you will need to remove the excess paracord and secure cord to keep it from coming uncompressed, there are a couple of ways to accomplish this. Keep in mind that at this time you will only be removing the excess Urban Camo (main) strands, leave the black (core) strands in place.

  • Use a Quilting Pin (or whatever you have on hand that will substitute) to hold the Urban Camo paracord in place.
  • I used a Wood Burning Tool to cut the strands and melt them in place at the same time.
  • You can use scissors to cut the paracord and then use a lighter to singe the ends, then you can use a matching color thread to secure the Urban Camo paracord in place.
Once the Urban Camo paracord is secured in place you can attach the opposite end of the buckle with the black paracord. I wrapped it around the buckle twice and tied a Cow Hitch by joining the ends together and hiding the joint inside the buckle. To learn how to join two pieces of paracord, Wishbone1138 has a video showing the technique.


SOURCES AND REFERENCES

Tuesday, February 28, 2012

STITCHED SOLOMON BARS

Last week I decided I would go on a little hiking and fishing trip and I would need to take along the right type of paracord bracelet. Although the Stitched Solomon Bar by JD at TyingItAllTogether isn't what I would call a "survival" design, it is becoming one of my all-time favorite bracelet designs, so I decided it would be the design I wanted to tie.
A few months back I purchased a Carabiner Keychain with a Compass from Walmart, and until now I hadn't decided how I would use it. Since these bracelets are going to be used for hiking, fishing, and other outdoor events, the colors didn't need to be flashy so I went with a single color on each bracelet.
Since I was going to be using a single color, I thought about tying the bracelets with a single strand of paracord, but it would be easier to use two lengths instead. I used approximately 8 feet of cord to tie the Solomon Bar sections of the bracelets and approximately 2 feet for the stitched sections.


If you decide to use a Carabiner Keychain like the one in this post, you will need to first remove it by sliding it off the keychain. Then you will need to decide the location on the bracelet that you would like to place the compass. And then start tying the bracelet as you would normally tie, when you reach the point to attach the compass, attach the compass by inserting all four strands into the slot and from the opposite end of the compass, start tying the bracelet again.

Once I tied the first two bracelets, I decided I might want a little bit of flare every now and then so I tied an OD with Neon Orange bracelet.

SOURCES AND REFERENCES

Tuesday, February 14, 2012

CROSS KNOT FALLS BAR

This is a variation of a design by Hotmetalmel from the Fusion Knots Forum it uses fused Cross Knots separated by the Endless Falls Knot by TyingItAllTogether. I added a loop for a keychain and attached it with a couple of Blood Knots.

The Cross Knot looks good from the front and backside, but on this design, I prefer the look of the backside of the knot coupled with the backside of the Endless Falls Knot which makes a great looking bar.


Front View
Side View

SOURCES AND REFERENCES

Monday, February 13, 2012

HOW TO MAKE A PARACORD FENDER KEYCHAIN

I decided since the tutorial was going to be rather long that I would publish this tutorial on Instructables instead of one big post.

You can view the tutorial by clicking this link.

You can download the full tutorial in PDF form by clicking this link.

Thursday, February 9, 2012

HOW TO TIE A WALL SINNET

I was thinking for my first tutorials that I would show some of the knot designs that you might commonly see. This is a great design, it's easy to tie and can be used with different strand variations. I am showing the directions for a Two Strand Wall Sinnet, but the directions are the same regardless of the amount of stands you choose to use. A Wall Knot is tied almost like a Crown Knot, but instead of going over its neighbors loop, it goes under. It sounds more complicated than it actually is, so check out the tutorial for a better visual description.